Hey there, Twitchers! Let’s talk about something important: How to delete clips on Twitch.
Twitch is one of the most popular live-streaming platforms online (with over 140 million viewers), where content creators can share their gaming, music, or art with viewers in real-time. As a Twitch streamer, one crucial aspect of channel management is deleting clips that are no longer relevant or appropriate.
In this article, we will provide a step-by-step guide on how to delete clips on Twitch, so you can keep your channel organized and maintain a consistent look for your viewers.
Whether you’re a beginner or an experienced Twitch streamer, this guide will help you navigate the platform’s settings and remove unwanted clips from your channel.
Table of Contents
Why you should delete clips on Twitch?
Twitch clip deletion is an important component of channel management that every Twitch streamer should prioritize.
For starters, it helps to keep your channel clean. Managing your Twitch content ensures your channel represents your brand – this doesn’t happen by accident. So it’s important to consistently evaluate and eliminate unwanted videos on a regular basis.
Second, removing clips helps safeguard your content. Twitch fans can produce snippets of your live streams, which can be a great way to promote your content; however, these clips can be used without your permission. VOD vultures could steal your content and re-upload it without your consent. Or worse, your channel gets overcrowded with nothing-burger-clips.
Lastly, eliminating clips aids in the organization of your channel. When you upload new videos to Twitch, if you don’t take care to manage the fluff, your channel can run feral with old footage. Not only does this create a cluttered space, it can also create SEO problems. Keep your channel structured and make it simpler for visitors to locate your most recent and relevant material by eliminating these videos.
How to delete clips on Twitch through a desktop app or website
Step 1: Enter your Twitch username and password. You can use the desktop app or navigate to Twitch.
Step 2: Select your profile image by clicking on it. This will be visible in the upper right-hand corner of your browser or application window.
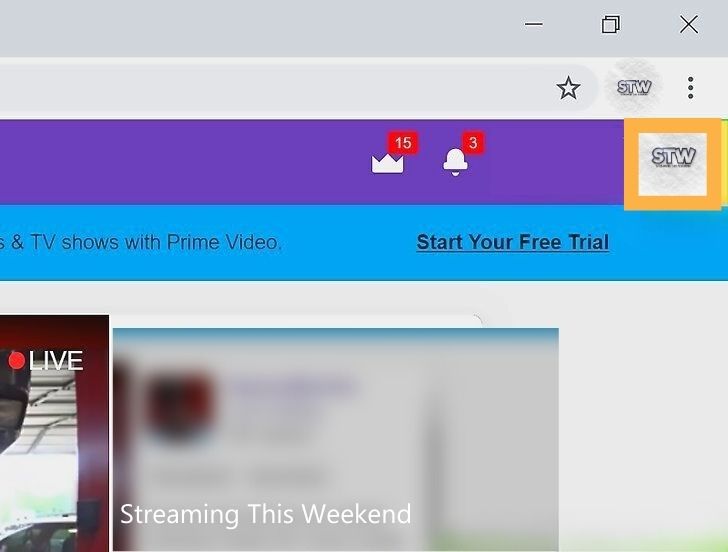
Step 3: Click on Creator Dashboard.
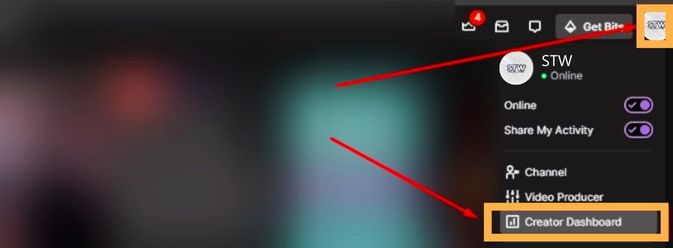
Step 4: With the Creator Dashboard page opened, click on Content.

Step 5: Click on Clips.
Step 6: Here you will find all the clips you have, select the clip you want to delete.
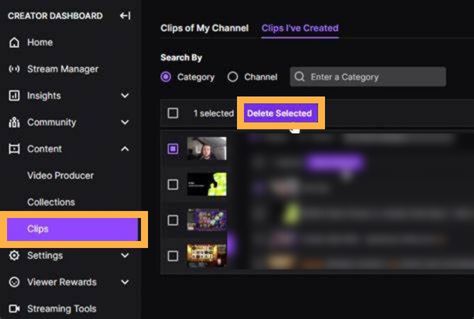
Step 7: Click on “Delete” from the menu that appears.
Step 8: Confirm that you want to delete the clip by clicking on “Delete” again in the pop-up window.
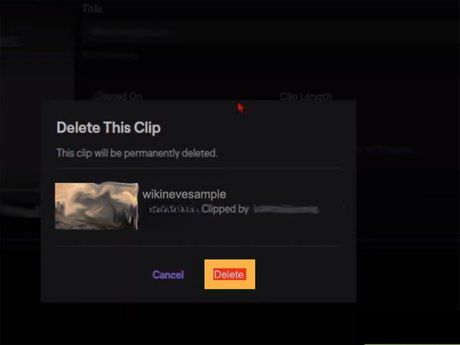
The clip will now be removed from your channel and no longer viewable by visitors.
Tips for making the process smoother
How to select multiple clips for deletion
Want to delete multiple clips? Just select them all before hitting delete.
Tips for you: Want clips automatically created? Check your settings to adjust or turn off the feature.
Errors to prevent on how to delete clips on Twitch
1. Accidentally deleting the wrong clip
Don’t delete the wrong clip by mistake (talk about a face-palm moment). If you want to save a duplicate of the clip, download it first before deleting it.
2. Not checking for copyright infringement
It’s important to check for potential copyright infringement on your clips. Failing to do so could result in legal consequences, like a lawsuit or copyright strike. It’s always better to err on the side of caution and make sure that you have the proper permissions or rights to use the content before deciding whether to keep it.
3. Not saving a copy of the clip before deleting it
Again, we can’t say this enough: save a duplicate of the clip before deleting it. Failure to save a copy can result in the loss of valuable content that is likely impossible to retrieve.
How to control who can create clips on Twitch
You may want to control who can create clips of your streams. Fortunately, it’s easy to filter your videos by adjusting the clip creation settings in your Twitch account.
Simply visit the Twitch website and log in to your account. From there, click on your profile picture and select the “Dashboard for Creators” option. This will take you to your Creator Dashboard, where you can access various settings related to your channel.
Next, click on Settings in the left-hand menu, and then select Channel. This will bring up a list of options related to your channel, including settings for clip creation.
To restrict who can create clips of your streams, you have two options: Followers-only or Subscriber-only. If you select Followers-only, only users who follow you will be able to comment (you can tighten this further as an affiliate or partner).
If you choose Subscriber-only, clip creation will be restricted to your subscribers exclusively. This can be a great option if you want to reward your most dedicated fans with exclusive access to your content.
Ultimately, what you decide will be based on your audience and marketing goals; whatever your objective, however, keeping your clip space clean will help users find the very best content you have to offer.
Final words on how to delete clips on Twitch
That’s all there is to it, guys! It doesn’t have to be difficult to delete clips on Twitch. Just keep an eye on it so your channel looks fresh and avoid any potential legal issues by removing clips that violate Twitch’s TOS.
And, last but not least, make it a habit to regularly review and delete old clips.
Further reading:
How To Go Live On Instagram From A PC: Possible In 2023?
How To See Deleted Messages On Discord (Super Easy In 2023)
How Can I View My Instagram Live Video Archive in 2023?
